Pages

Thursday, February 28, 2013

Kelley Baker Brows How-To:


Hi guys!
So excited to show you how to get some fabulous brows using Kelley Baker Brow products. My natural brows are soo funny looking and so out of shape, so I always fill them in and add more shape and life to them. Just like finishing a look with the right lashes or lipstick, its just as important to have polished brows. This is my new brow routine and I am not changing it anytime soon thats for sure. :)

The top left picture is what my natural brow looks like. (I know, not cute) lol
I fill under my natural brow shape starting with the inner corner all the way down to the tail of the brow using Kelley Baker Brow Powder in Ash Brown with the flat angled brush.

Next, I highlighted the brow and helped define it with the Highlighter Pencil from KBB and blended the excess product down with the flat highlighter smudge brush. I also took a little of the highlight to the top of the brow to give it some cleaner lines.

Lastly, I set my brows with the KBB brow gel to keep them in place all day.

I love how minimal it is to get fierce brows with Kelley's products. The powder is so pigmented and a little goes a long way. My abs favorite is the highlighting pencil. Its a must, since its similar consistency to a concealer, its so opaque and helps cover any little stray hairs you may have to help you achieve a cleaner polished brow. Cannot wait to visit her in April so she can work her magic on my brows. If you live in the Southern Ca area go see her and make an appointment ASAP at her brow bar.


Enjoy, 

xo kb


Finished brows below.


Wednesday, February 27, 2013

January & February Beauty Faves


Hi there my beauties!
Here to share with you guys today is my current beauty favorites. These are all products I have been reaching for a lot in January & February. These are just basic, easy everyday products that I love to use whether I am going out or going to work. 

Soleil Tan De Chanel : 
A light bronzer I use to contour and add a light bronzy glow to my face.
NYX - Stay Matte Not Flat Powder Foundation : 
Keeps the oil on my skin under control and has a silky finish
MAC - Stereo Rose MSF
MAC - I'm The One blush
My favorite bubblegum pink blush everrr


NYX Jumbo Eye Pencils in Milk & Black Bean :
On the far left below you can see I de-potted or de-penciled on of my Milk Pencil and put it in a MAC Paint Pot container. Easy to dip my brush in for pigmented application. You can use this pencil as an eyeshadow base to make the shadow your applying on top more pigmented and vibrant. Theres literally a huge variety of things you can do with these pencils.
 With Black Bean, you can create an easy smokey eye in minutes, just apply black bean all over the lid up to the crease and blend up with a blending brush.


NYC Liquid Liner :
The best, most inexpensive liner. Super black and glides on very smooth.
NYX Blue Liner & Silver Glitter Liner :
The blue is so pigmented and bright. The silver glitter takes a couple layers to really get a full sparkle. What I do is, I put a generous amount of product on the top of my hand and with a flat synthetic brush and pack it onto my lid. Easiest thing to do if you do not want to deal with loose glitter.


MAC - Boyfriend Stealer & Cyber
Lime Crime - Airborne Unicorn
OCC Lip Tar - Hoochie
Whitening Lightning Color Your Smile - Icicle
MAC Lip Erase - Dim

Seems like when I go out at night my go to lip color is a dark one or a purple one with a sparkly gloss on top.


Benefit POREfessional : 
I was so happy to receive this in the little 'How to look your best at everything' Box by Benefit from Sephora. I was always skeptical to purchase the full sized one just to maybe find that it didn't do anything for me, even tho I have heard nothing but good things about it. I wouldn't say I have big pores but I def have some fine lines and small pores that are noticeable to me. This product has a thick but not heavy, balmy texture. It doesn't get rid of my pores but it does smooth out my face dramatically and keeps the oil on my nose under control. It helps gives my foundation a smooth matte finish.


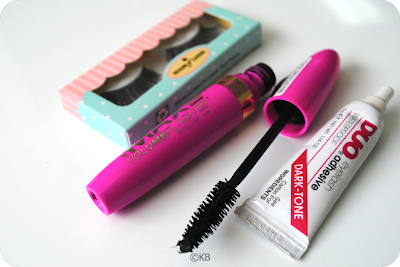
DUO Lash Adhesive DARK-TONE

House of Lashes - Hollywood Glam :
I wear these when I want a natural look and don't want any big or flashy lashes. They add just the right amount of drama to any natural look.


Camouflage Concealer Palette :
The most amazing thing in the world. This palette comes with 10 different shades of concealer and you can mix and create your own custom color. The product is so creamy and is very opaque. It dries fast and can look cakey if you apply too much. I can cover any imperfections and blemishes with this palette as well as contour and highlight. This is a really amazing product to keep in your kit.


xo kb

Monday, February 25, 2013

I heart Kelley Baker Brows


Hi There! 
I nearly died when I received my package from Kelley Baker Brows. I hear such wonderful things about her products from so many people on IG. Kelley was so sweet and sent me her line of brow products to try out. I am so happy to have met her thru Instagram, she is one of the nicest people i've ever met. Not to mention she's a brow guru. I haven't had a chance to create some fierce brows with these products yet but I did have some time to play around with them! First of all, how adorable is the packaging, her classic black and pink with her logo, I love. I received the Brow Powder in Ash Brown, Brow Gel, Highlighter Pencil, Angled Spooly Brush, Highlighter Brush and Lipgloss in Pink Rocks. The highlighter pencil has amazing opaque coverage (kinda similar to a concealer but in pencil form) and instantly brightens anywhere it's used, and its so blendable. The brow powder is so pigmented, you get a beautifully rich color payoff.  Oh and don't even get me started on how amazingly gorge the Pink Rocks lipgloss is. You will def be hearing about my brows all week. :)

xo kb


What's in my purse...


Hi dolls,
Hope you enjoyed your weekend! I spent the whole Sunday at home cleaning and doing laundry. Fun right?! I cleaned out my bag today, got rid of loose change, receipts and gum wrappers and wanted to show you guys what must haves in my purse contains. Lately, I find myself not using big bags because that means I will carry tons of things with me including the kitchen sink. Lol. I moved into my Michael Kors Hamilton bag and toted it around all weekend. Below is everything listed that you see in the pictures. Most of the stuff I carry is just things I think I may need with me but never end up touching once its in my bag.

iPhone
Keys
Prada Butterfly Sunnies
Hello Kitty Wallet - Obviously where I keep all my cards, money, license and change.
Hand Sanitizing Wipes - Most essential thing in my bag other than my iPhone for when I cant wash my hands. I hate germs. No matter how big or small my bag is, I always carry this.
Tiffany Pouch - I wash my hands a million and 1 times during the day I store my wedding rings in the pouch so they don't get lost in my bag.

Makeup Bag - From F21
Lipstick - Way too much by the way... I usually throw the lip color i'm wearing that day and they just build up over the week.
Lipgloss- Again, too much.
Maybelline Great Lash Clear - I use it to smooth down the baby hairs and flyways in my hair.
Nars Laguna Bronzer
NYX Matte Powder Foundation
Chanel Tweed Highlighter - This stuff sucks but I just use it for the chic compact mirror :)
Lash Case - Just in case I need to take off my lashes because of allergies, and obviously because its just too cute.

Enjoy,

xo kb


Saturday, February 23, 2013

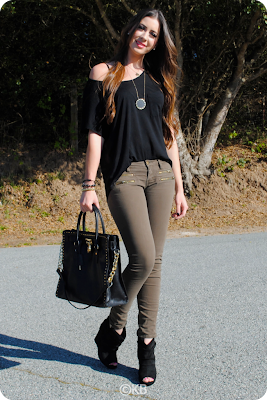
Kors & Wedges - OOTD Saturday, February 23rd


Hi guys! 
I finally got out of my house to shoot this for you! Thanks to my sister who got me addicted to Nip/Tuck on Netflix, all I wanted to do today was lay around in my pajamas with no makeup and watch it on my Mac Book. Lol. So glad I didn't do that. I was happy to get out and enjoy this beautiful sunny weather we're having here with my hubby. I seriously cannot wait for summer. 

Anyways, here's todays Outfit of the Day, I kept it pretty casual. I had asked on twitter if it was something you guys would want to see on my Blog and you said yes! So here it is. I'm sure i'll end up changing my outfit in a few for dinner because its cold out now. Lol. 

Top: Forever 21
Pants: Forever 21
Shoes: BCBG Orena Suede Wedges
Bag: Michael Kors - Large Hamilton Whipstitch Tote *obsessed*
Necklace: House of Harlow; Sunburst Pendant Necklace
Skull Bracelets: SimplyLovey on Etsy

*if you want me to start putting links above so you can locate these items let me know and I will start.*


Friday, February 22, 2013

Doll Eyes


Hello!
How happy are you that it's finally Friday!? Lots of fab plans for this weekend, and thats including my first Outfit of the Day for you. I should have it up tomorrow depending how the pictures turn out. Lol. Today is my sister in law and father in laws birthday so we are going to dinner to celebrate tonight. So I kinda went a little more dramatic on the makeup today so I don't have to do a ton of touching up before we go to eat, just a lipstick change and some powder. I will list all the products I am wearing at the end.

So, I wanted to show you how to apply false lashes to the bottom lash line. Most people don't just have the pack of individual lashes just hanging out in their makeup so I wanted to show you how to apply strip lashes to the bottom. Usually because of my allergies, I don't wear shadow or liner on the water line or under my eyes because they water a lot and before you know it, it looks like i've been crying. So that leaves me with wearing waterproof mascara only most of the time (boring I know). Today, I wanted to do thick Kim K. inspired lashes. Her bottom lashes always look so full and thick without looking crazy. Since I didnt have the individuals I decided to improvise and cut up a pair of NYX 210 lashes. You don't want to use crazy full lashes to do this or else you will look like you have creepy spider lashes.

First, I choose these NYX 210 lashes and cut them into sections with a pair of beauty scissors.


Next, I added clear lash glue to the bases of the lash strip. The thicker and darker pieces of the cut lashes will go toward the outer eye, and as you get closer to the inner part of the eye the lashes will get lighter. Then I just simply place each individual cut section right underneath where my natural lashes grow carefully with tweezers so they blend in well. 

  
*Again, excuse my eyes they are a little red and irritated due to allergies*

Super easy and quick. I hope you enjoyed this mini tutorial. Heres what a bigger view of it looks like.

Products used today:
Face:
Foundation : MAC Studio Fix Fluid mixed with L'oreal True Match Lumi
Powder : MUFE HD Translucent Powder
Blush : Nars Orgasm 
Contour : Benefit Hula
Concealer : Coastal Scents & Bobbie Brown Creamy Concealer

Brows:
MACs Lingering, carved out with BB Concealer

Eyes:
Base : MAC Paint in Bare Canvas
Lid : NYX Jumbo Pencil in Milk
Crease : MAC Handwritten, and Fig 1 blended out with Soft Brown
Liner : NYC Liquid Liner
Mascara : Rimmel Extreme
Lashes : Red Cherry #102
Bottom Lash : NYX #210 cut up

Lips:
Color Your Smile Lip Volume Gloss in Crystal


Enjoy!

xo kb

Thursday, February 21, 2013

Pearly Whites

I couldn't be more excited to start using these Whitening Lightning products. Theres nothing I love more than sparkling white teeth. I mean, I would say my teeth are white but I know I can get them more pearly and pretty and who doesn't want pretty teeth?! I received the Dial A Smile Kit, Brow Bar To Go, Color Your Smile Plumping Glosses, and 2 whitening pens. I have used whitening kits before but they have always left my teeth very sensitive and they kind of sting. I def do not like that. Ive heard lots of amazing reviews about Whitening Lightning and the cute little light you use along with it. I am going to start the Dial a Smile kit this weekend and I will update you guys the whole way thru this little experience and let you know the results I get! When I opened my package I was sooo thrilled to see I was sent the 3 glosses. In their lip gloss formula it contains collagen which is supposed to plump and increase lip volume. We all know I could use a little more plump, my lips are so thin. I envy all of you with big gorgeous smoochers. Lol. The other night I tested it out and wore Jewel (the reddish one) on top of Macs Red Racer. You receive beautiful color payoff and a little lip volume boost without the pain or stinging. Whats even more amazing is the lipgloss top has light built into it and turns on when you go to use your gloss. Little details always matter to me. :)

If anyone is interested in trying out these products you can go to WhiteningLighting.com and use code Gorgeous70 for 70% off your order! 

I cant wait to share my results and experience with this product with you all, my hubby is even going to help me test it all out. If you are interested I can show you guys a step-by-step pictorial on how to use these products. 

xo kb


Wednesday, February 20, 2013

Lash Heaven

Just wanted to show you guys the lashes I have currently been lusting over, which is pretty much everything from House of Lashes. They have 4 collections that cater to the specific look you are going for; Au Naturale, Goddess, Glam and Premium Luxe. Ever since I was sent them in January, I have been wearing this brand and I couldn't be happier with them. My everyday look is always paired with the Temptress lashes. All of them are so comfortable and the band is light weight and flexible and made from premium sterile human hair. My abs fave lashes for a dramatic full look are the Noir Fairy in the purple box and they are synthetic. I was so excited to see that they come in brown as well as the standard black. Below you can find looks I have put together wearing these lashes. Right I am wearing Temptress and Left I am wearing Feline.

Oh and can we please talk about how adorable this pink lash case is? I have been in need of a box to store all of my used lashes in when I travel or when I just need to store them at home. So convenient and gorgeous at the same time. You def need one if your a lash junkie.
We heart you House of Lashes

You can purchase their lashes and bow case at

xo kb


Tuesday, February 19, 2013

Mini Ulta Haul

Hi my gorgeous, Happy Tuesday! So my sisters and I took a trip to Ulta last night and obviously, I found a few things I didn't need but purchased anyways (story of my life).  I wasted no time and headed straight to my favorite part which is the NYX aisle. NYX is one of my fave drug store brands they great quality products at affordable prices. Of course I found a thing or two or three, but believe me I didn't go crazy or spend a lot of money. I only purchased a few items and even found a few lashes on the sale shelf. Yes, we all know I clearly have enough lashes to last me for the rest of my life and more. Lol But honestly, what girl can walk past a shelf that has lashes on sale? I sure cant. (You know you can't either). I had purchased 3 sets of lashes but i'm pretty sure my sister stole one. Here is my baby haul:

NYX HD Studio Powder Foundation (02 Nude) $9.49
NYX Doll Eye Mascara (Extreme Jet Black) $8.99
Real Techniques Shading Brush $5.99
Khroma Beauty Lashes (Scintillate Lashes) $6.49
NYX Lashes (#111) $2.29
Sweet & Shimmer Faux Lashes (No # or Name) $0.99


Now, I honestly don't know why I purchased the Sweet & Shimmer lashes *rolling eyes*. Seeing as I will never wear those ugly things in public, my sister convinced me to buy and said I could do a look for you guys. Plus they were only .99 cents.


Very much looking forward to trying out the NYX 'Stay Matte Not Flat' powder foundation. The texture is very silky and the coverage seems build-able, hopefully it will be able to control shine without having to do tons of touch ups. This product would not be good for dry skin, since its a matte foundation it will work best for oily skin. They have a pretty good range of about 15 color choices so you shouldn't have any problems finding the right shade.

I get asked a lot on IG about Real Techniques brushes and I have to say, the ones that I do own and have used are abs amaze, thats why I purchased another one. I have the setting brush, stippling and large powder brush. All the other ones are always sold out at Ulta. They are so soft and plush. I get the most airbrushed finish with all of their brushes. So I just purchased this shading brush in hopes of the same happiness as I have with the others.

Have you tried any of these products?

xo kb